Something New: Eyelash Extensions!


I’ve written an updated post on my eyelash extension experience over here! My monolid lash extension experience [Updated]

IMG_8772.JPG

One of my new years resolutions (and life resolutions really) is to always be trying new things! Whether that new thing is something huge or something little, I always want to be challenging and educating myself through new life experiences. I know that as an introvert and a homebody, it can be only too easy for me to stick with what I know and what’s comfortable, so I'm challenging myself to try something new each month. Whether it's beauty, fashion, food, volunteering, work-related, or really just anything in life - it's always fun to try something new!

This month, I am so excited to share my experience with eyelash extensions! I’ve been wanting to try these for quite some time after hearing a lot about them through social media, I finally decided to take the plunge last month before we went on vacation!

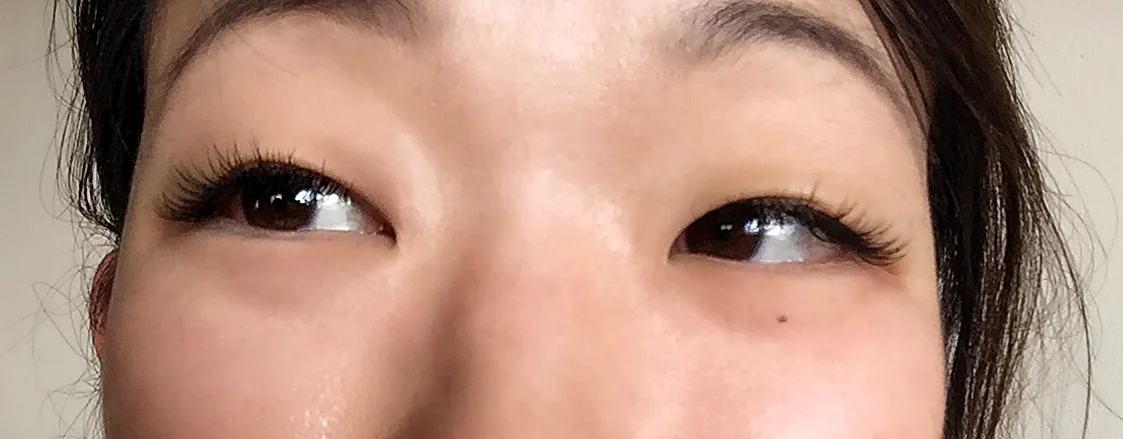
Like most asian girls out there, I have stubbornly short, stick-straight lashes. I’ve tried tons of mascaras, lash curlers, and even growth serums but nothing has really worked well enough to make it into my regular make-up routine. I also have monolids (which means that I don’t have a crease in my eyelid) and this causes my eyelids to weigh down my lashes so that they typically point straight down in front of my eyes. As you can imagine, this causes all sorts of make-up headaches with mascara getting into my eyes, not being able to see through my lashes, and smudges all over the place. My current make-up routine pretty much ignores my eyelashes altogether because frankly - they’re just not the worth the trouble!

Enter eyelash extensions. Eyelash extensions are a professional service done by lash technicians where an individual extension is placed on each of your natural lashes to create long, fluttery lashes! Most places say that they last between 4-8 weeks if you take good care of them. From my research online, I’d heard that eyelash extensions were great for vacations and travel, so since we were on our way to the Caribbean, I figured it would be the perfect time to put eyelash extensions to the test.  In order to get the full experience, I received a full set of lashes and then went in for a lash fill 4 weeks later. 

IMG_8773.JPG

The Experience

For my first full set of lashes, the entire process took about an hour. Since it was my first time trying out eyelash extensions, my lash technician chose to go with shorter, more natural looking extensions. In order to keep your bottom lashes out of the way and to help the technician see your lashes better, they place a white sticker-type thing underneath your eyes. The only part of the process that was a little painful was when my lash technician removed the sticker from under my eyes at the end! Other than that, I only felt a little bit of pulling and tugging here and there. It’s definitely a long process and since you have to keep your eyes closed the entire time, it can be easy to fall asleep (guilty)! My 4 week lash fill was a shorter process and took ~45 minutes instead of the full hour. Overall, the process of putting the eyelash extensions in place was pretty non-memorable.

The Lashes

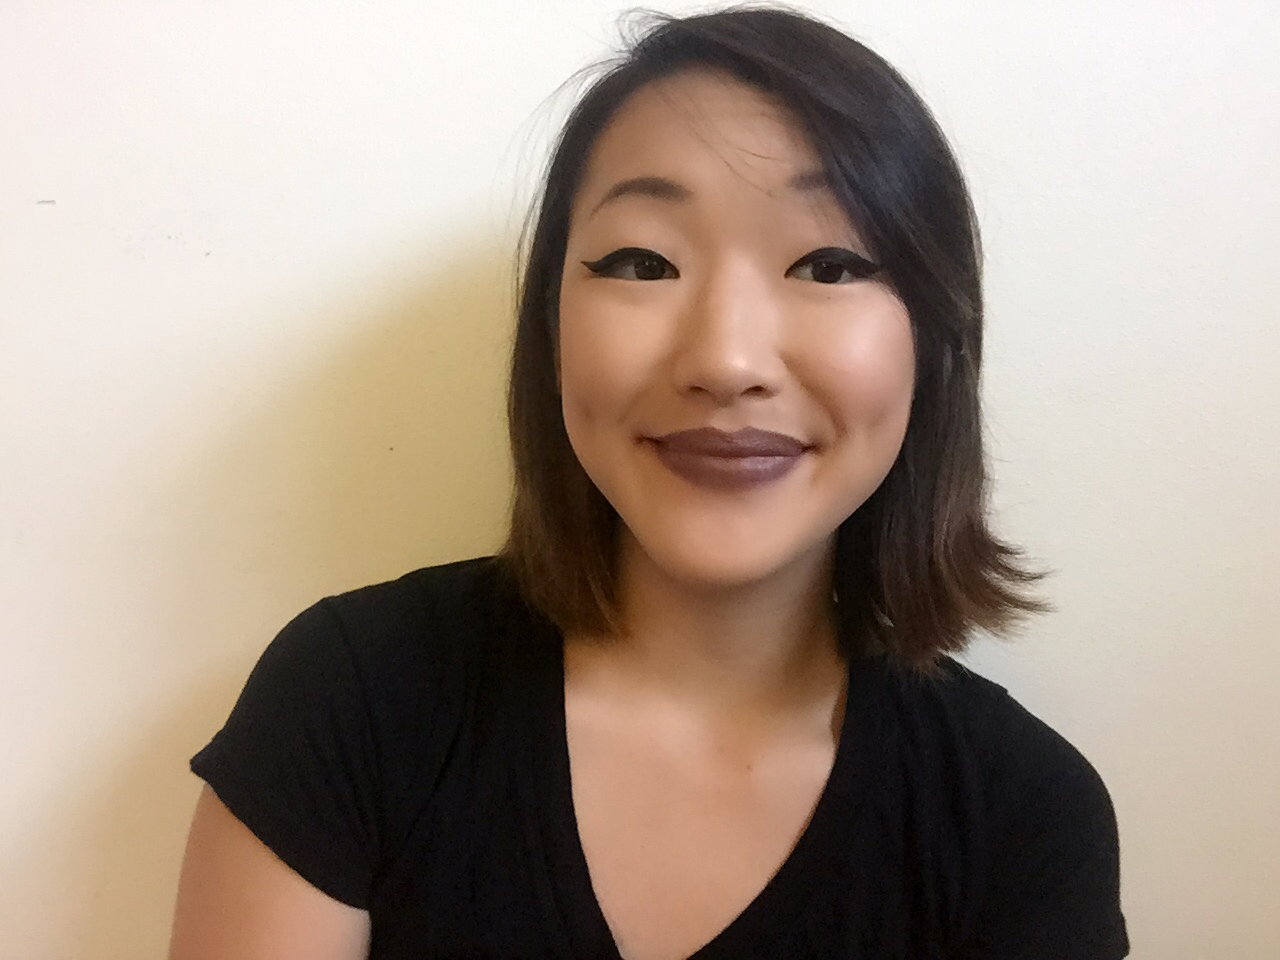
Look: The look of the lashes was definitely what I was most excited about! The first set of lashes I received were almost invisible since they were so hidden by my heavy eyelids. Since the first set of lashes weren’t very noticeable under my lids, I kept make-up super light and wore double eyelid tape or glue to help pull my lids up. This way, the lashes were much more visible. At my 4 week lash fill, I asked for longer extensions and was really impressed by how much the longer lashes opened up my eyes! I didn’t feel like I needed to wear too much additional makeup since the lashes were already adding so much extra dimension to my eyes. 

Comfort: This is probably my biggest complaint about the extensions I received. As I mentioned previously, I have monolids and as a result my heavy upper eyelid kept pushing the eyelash extensions down over my eyes. This not only prevented me from being able to see clearly, but also caused several of the eyelashes to stick and lay flat against my eyeball. I also wear contacts so having a giant eyelash glued to my eyeball and my contact lenses? NOT FUN. As I mentioned before, I wore double eyelid tape to help make the eyelashes more visible, but this also helped pull the lashes up out of my eyes!

Durability: Most lash technicians say that the extensions last between 4-6 weeks with good care. Although there is nothing that says you can’t wear makeup with lash extensions, you do have to avoid oil based makeup removers and be much gentler when taking off makeup around the eye area. In my experience, the eyelash extensions only lasted 2 maybe 3 weeks. For both sets of extensions I received, there were only a couple of eyelashes hanging on for dear life by the end of week 2. I wore very limited eye makeup (usually just eyeshadow) with the extensions and tried my best to be careful with removing makeup and drying the lashes but it still wasn’t enough! 

IMG_8770.JPG

The Cost

My lashes cost $75 for a full set and $55 for the 4 week fill. From what I’ve gathered, this is definitely on the cheaper end as far as eyelash extensions go. The prices vary quite a bit depending on where you get them done and where I’m from, a full set can cost you up to $300! 

Final Verdict

Overall, my experience was mixed. I think extensions would be perfect for vacations or the summers when you don’t want to worry too much about applying and reapplying makeup in hot weather, but as an everyday thing, I think the cost and maintenance of the lashes is just too much for me. If the lashes really lasted 4-6 weeks at a time, I think I would feel differently but either the lashes I received or simply the shape of my lids really made it so that the lashes only truly lasted 2 weeks. I loved the eyelashes during that 2 week period, but a $75 cost for only 2 weeks of lashes doesn’t really seem worth it to me.

With that being said, a lot of the issues I experienced seemed to be related to the fact that I have monolids. I don’t think everyone will have the same experience since eye shapes and sizes vary quite a bit - but if you have monolids like myself - it’s worth considering whether you want to deal with all of the trouble they can cause! 

Have you tried eyelash extensions? What was your experience like? I’d love to hear your thoughts!

Favorite Products for Nude Lips! ♥


IMG_1936.JPG

Hello and happy March everyone! I am so, so happy to be sharing my thoughts on my favorite nude lipsticks today - because all I’ve been wearing for the past month are nudes! As ridiculous as this may sound, before this month, I didn't really have a nude lipstick that I considered my "everyday" lipstick let alone a collection of easy-to-wear nude shades. I love trying out new lipsticks so much that I never really settle on one shade before I find another one that I like better Recently, however, I've found that while I can cycle through bright lipsticks on the weekends, they're not always practical when it comes to the workweek! Plus, if I’m being honest with myself, wearing a nude lipstick simplifies things so much more - way less worrying about lipstick on my teeth or eating with lipstick on! So without further ado, my favorite nude lip products!

Marley, our foster kitten, really wanted to be involved in the photoshoot! :)

Marley, our foster kitten, really wanted to be involved in the photoshoot! :)

IMG_1937.JPG

Lord and Berry Lipliner in 3035 Nude: I’ve mentioned this product in a previous post before, but it still holds true - this lipliner by Lord & Berry is one of my all-time favorite lipliners! It’s a wonderful warm brown lipliner that adds a little bit of warm color to the lips but still looks incredibly natural. My only gripe is that I wish it would last longer! Since I use it all over the lips (instead of actually lining the lips) and it’s a product that requires sharpening, a lot of times the product gets used up way too quickly. 

Milani Color Statement Lipliner in Spice: Since the Lord & Berry lipliner I just mentioned above runs at around $18 per liner, I’ve been on the hunt for a more affordable dupe! The closest liner I have found is the Milani Color Statement Lipliner in Spice. It typically runs between $3-$4 which is a much more affordable price point for a comparable product! Although this shade is not an exact dupe for the 3035 Lord & Berry liner (I think it’s a tad more cool toned), for the way lower price, I’m happy 😃 

IMG_1938.JPG
IMG_1939.JPG

Elf Matte Lipstick in Praline: This lipstick from Elf has been my favorite on-the-go lipstick! It’s extremely affordable ($3 whoo!) and is a pretty close match for my natural lip color so it’s been so nice to have this lipstick handy for long days when I need a refresh or just floating around in my bag in case I have a lipstick emergency! Plus, since it’s so affordable, I have quite a few on hand just in case I lose one!

TheBalm Meet Matte Hughes in Committed: I actually received this in an ipsy bag way long ago (Ipsy: October 2015) but didn’t fully appreciate until now (almost a year and a half later!). I love this shade because it’s a little on the pink side of things, but not so pink that it doesn’t still count as a nude shade. It’s extremely wearable but gives off those just-came-inside-after-a-frolick-in-the-snow kind of pinky vibes 😃 

IMG_1940.JPG

Colour Pop Ultra Satin Lip in Magic Wand ♥ 

Last but certainly not least, this color pop ultra satin lip shade has lived in every single purse I own for the past month!  During the holidays, I purchased the Colour Pop On a Whim mini ultra satin lip set (Review: Here) and fell in love with the Magic Wand shade! While I'd originally gone on a Colour Pop binge with the intention of trying out the ultra matte formula, I actually ended up loving the formula of the satin lipsticks much more than the mattes. I loved this particular shade so much that I now have not one, not two, but three of this lipstick because obviously, I need one for each of my purses, too 😛 

What I love about this shade is that it’s very muted and evens out the lips nicely - which makes the whole look feel more put together and allows the focus of the look to be on the eyes. Nothing too crazy or fancy - just a more put together, neutral look! I want to say that this shade is a "my lips but better" kind of shade but if I’m being honest with myself, my lips look nothing like this shade (my lips are naturally a more purple-y tone). The reason this shade falls into that category is because it looks like a shade that could naturally go with my face but actually goes with my face a lot better than my actual lips do. Whew, that was a mouthful! 

IMG_1942.JPG

The thing I love about all of these lip products is that while they are all nudes, there is still a lot of variety in the color and tone of each product! They are all extremely wearable and have made my everyday make-up routine much simpler! While these nude lip products have been amazing for me, however, a tip I have for buying nude lip products is that if you’re looking for a good nude shade, look for suggestions from bloggers who have skin tones similar to yours. I cannot stress this enough! I have made this mistake time and time again by buying a nude lip product that looks beautiful on someone else only to find that it looks absolutely atrocious on my skin tone! 😛

Have you tried any of these nude lip products? Which ones are your favorites? Are there any other nude lipsticks you think I should try? Leave me a comment, I’d love to hear your thoughts!  

loveellasize300signature.png

Colour Pop Holiday Lip Kit Review ♥


Liquid lipsticks have become such a favorite of mine over the past year that I absolutely could not wait to get my hands on some of the new holiday kits from Colour Pop! It seems like Colour Pop is most known for their matte lipsticks and since it's talked about so much in the blogosphere, I wanted to give them a go to see for myself! I ended up choosing two of their new holiday lipkits - Forever or Never and On a Whim

FullSizeRender-2.jpg
IMG_2555.JPG

Forever or Never

This is one of the full size lip kits from Colour Pop's holiday collection this year. I've tried Colour Pop's lippie stix in the past and have enjoyed the matte finish lippie stix the most, so I was looking forward to trying this ultra matte kit.

FullSizeRender-3.jpg
IMG_2541.JPG
IMG_3672 2.JPG
IMG_3676.JPG
IMG_3683.JPG
IMG_4060.JPG
IMG_4069.JPG
IMG_3673.JPG
IMG_3679.JPG
IMG_3680.JPG
IMG_4058.JPG
IMG_4063.JPG

My favorite of these shades has to be Bumble! I think it's a great everyday shade that's not too bright but gives my face the wake-up it needs on those cold winter mornings! While I loved the bright shades of this kit, I was actually a little bit disappointed by the formulas of the matte lipsticks. I'm not sure if all of Colour Pop's matte lipsticks have this same formula, but these lipsticks were so incredibly drying on the lips that it made them difficult to wear. Normally, I want a matte lipstick to be a little bit drying so that the color stays in place, but these lipsticks take it to an extreme level. I felt like I could see every little line in my lips and if I put more than one layer on, the lipstick would start to cake off in a matter of minutes. For the lighter shades, this didn't matter too much, but for the darker shades, it was a a little too obvious when the color started to flake off! 

IMG_4070.JPG
IMG_4071 2.JPG

On top of that, the darker shades left a bright pink stain on my lips even after I rubbed at them with make-up remover - so if you thought your lipstick was going to slowly fade into a natural lip color, you were wrong! As much as I love Colour Pop's other products, this was definitely a dud for me. I'll try my best to get some use out of these lipsticks and let you know if I find any better methods for cancelling out the dryness of the formula! After all, I do still very much love the beautiful colors of this kit. 


On a Whim

This little ultra satin set drew me in with its neutral shades since I've been looking for a neutral set of lipsticks to wear to work! Plus, they come in a sweet little travel size that is great for bringing on the go and for testing out different shades. 

IMG_2547.JPG
FullSizeRender-1.jpg
IMG_4076.JPG
IMG_4079.JPG
IMG_4083.JPG
IMG_4087.JPG
IMG_4092.JPG
IMG_4074.JPG
IMG_4077.JPG
IMG_4080.JPG
IMG_4084.JPG
IMG_4089.JPG

I loved the formula of these lipsticks so much that I'm a little disappointed that this kit was a mini, not a full size! While they are labeled as a satin formula and do feel very satin-y on the lips, I actually think they look quite matte and could definitely pass for a matte lipstick. I am a huge fan of this little kit and will definitely be perusing this formula for future lip purchases! 

IMG_4094.JPG
IMG_4093.JPG

Final Verdict: I think these holiday kits would make perfect holiday gifts for any make-up lover out there because it allows you to try a handful of different shades! Instead of the matte formula, however, I'd definitely suggest going for the satin formula for a more wearable lipstick! For both kits, I also felt that the shade in the tube was significantly darker than it appeared through the packaging. So, if you are shopping on Colour Pop's website, be mindful of the fact that the shade in the tube may actually be darker than it appears. What did you think of the Colour Pop holiday kits? What was your experience like? I'd love to hear your thoughts!