Ordering Our Wedding Invitations with Basic Invite | Basic Invite Review


Disclaimer: This is a sponsored blog post in partnership with Basic Invite. Basic Invite kindly sent me a set of sample wedding invitations for review. Opinions expressed in this post are 100% my own. Thank you for your support!

Hello, friends! If you are new around here - news flash - I am engaged! My fiance and I have been together for nearly a decade and have been enjoying an intentionally long engagement. Though we've known for a long time that we want to get married, we haven't been in a huge rush because we both enjoy taking things slowly and going against the social pressures of getting married after X amount of time. But after 2 years of enjoying our engagement, we decided it might be time to start planning this whole wedding thing 🙂

For this post, I've been working with folks over at Basic Invite - and truly the timing could not be more perfect because wedding invitations have been on my mind for the past couple of months. I'm really excited to be working with Basic Invite because it seems like they are the perfect fit for what I've been looking for and they've given me a ton of flexibility to freely give you my thoughts and honest opinions.

First, a little about me - I suck at planning events. Although I love decorating my home and love art, I really could care less about what the decor, flowers, or invitations for my wedding look like - as long as they look generally...nice? It stresses me out to think about all the little details that go into a wedding so using a website like Basic Invite that already has tons of wedding invitation templates available was great for my stress levels :)

THE OPTIONS

Basic Invite has pretty much any type of invitation or card you could possibly ask for from birthday invitations to stationery & business cards to holiday cards & christmas cards. In the wedding invitation space they also have tons of templates available for not just wedding invitations but save the dates, change the dates (hello to my fellow covid brides!), bachelorette parties, RSVP cards, and thank yous. Pretty much anything you might need!

THE CUSTOMIZATION

There are pretty much limitless customization options on the Basic Invite website. Though they have tons of beautiful templates to choose from, if you want to change the color of the invite, the font, the text size or placement, the shape of the invite, the type of paper it's printed on, and the envelope color - you can do all of that easily on the Basic Invite website.

For my samples, I really enjoyed playing around with the different templates and changing some of the colors and fonts to better fit my liking! There were some templates that looked a little funky sizing-wise once I inputted my wedding information or others where I preferred a different font/color and I loved being able to adjust the template according to these preferences. This would also be a great feature if you have very specific wedding colors that you want to adhere to since you can change any template's color to match your wedding colors.

My one note is that the customization feature can be a little glitchy sometimes. There were multiple times when I was customizing an invitation by changing the names on the invite and then a couple minutes later they'd bounce back to the sample names from before I had customized them. This was a little frustrating but not a total deal breaker overall. Just be sure to review the proofs of your invites multiple times before you check out at the end!

THE PRICE

There are quite a range of price points on Basic Invite because the price per invitation largely depends on how many invitations you are ordering and what kinds of customizations you've selected. The more invitations you order, the lower the cost per invitation. Typically, the lowest prices are around 99 cents per invitation but that's usually without any customized paper or gold foil, and you're usually ordering a very large quantity. In lower quantities, the price point is more around the $3-$5 range per invitation.

In addition to that, shipping is a little on the pricey side ($9.99 for standard shipping) but in my experience it has been super quick and our customized samples were delivered within 2 weeks of submitting the order. They also offer two other, quicker shipping options in case you need your invitations sooner!
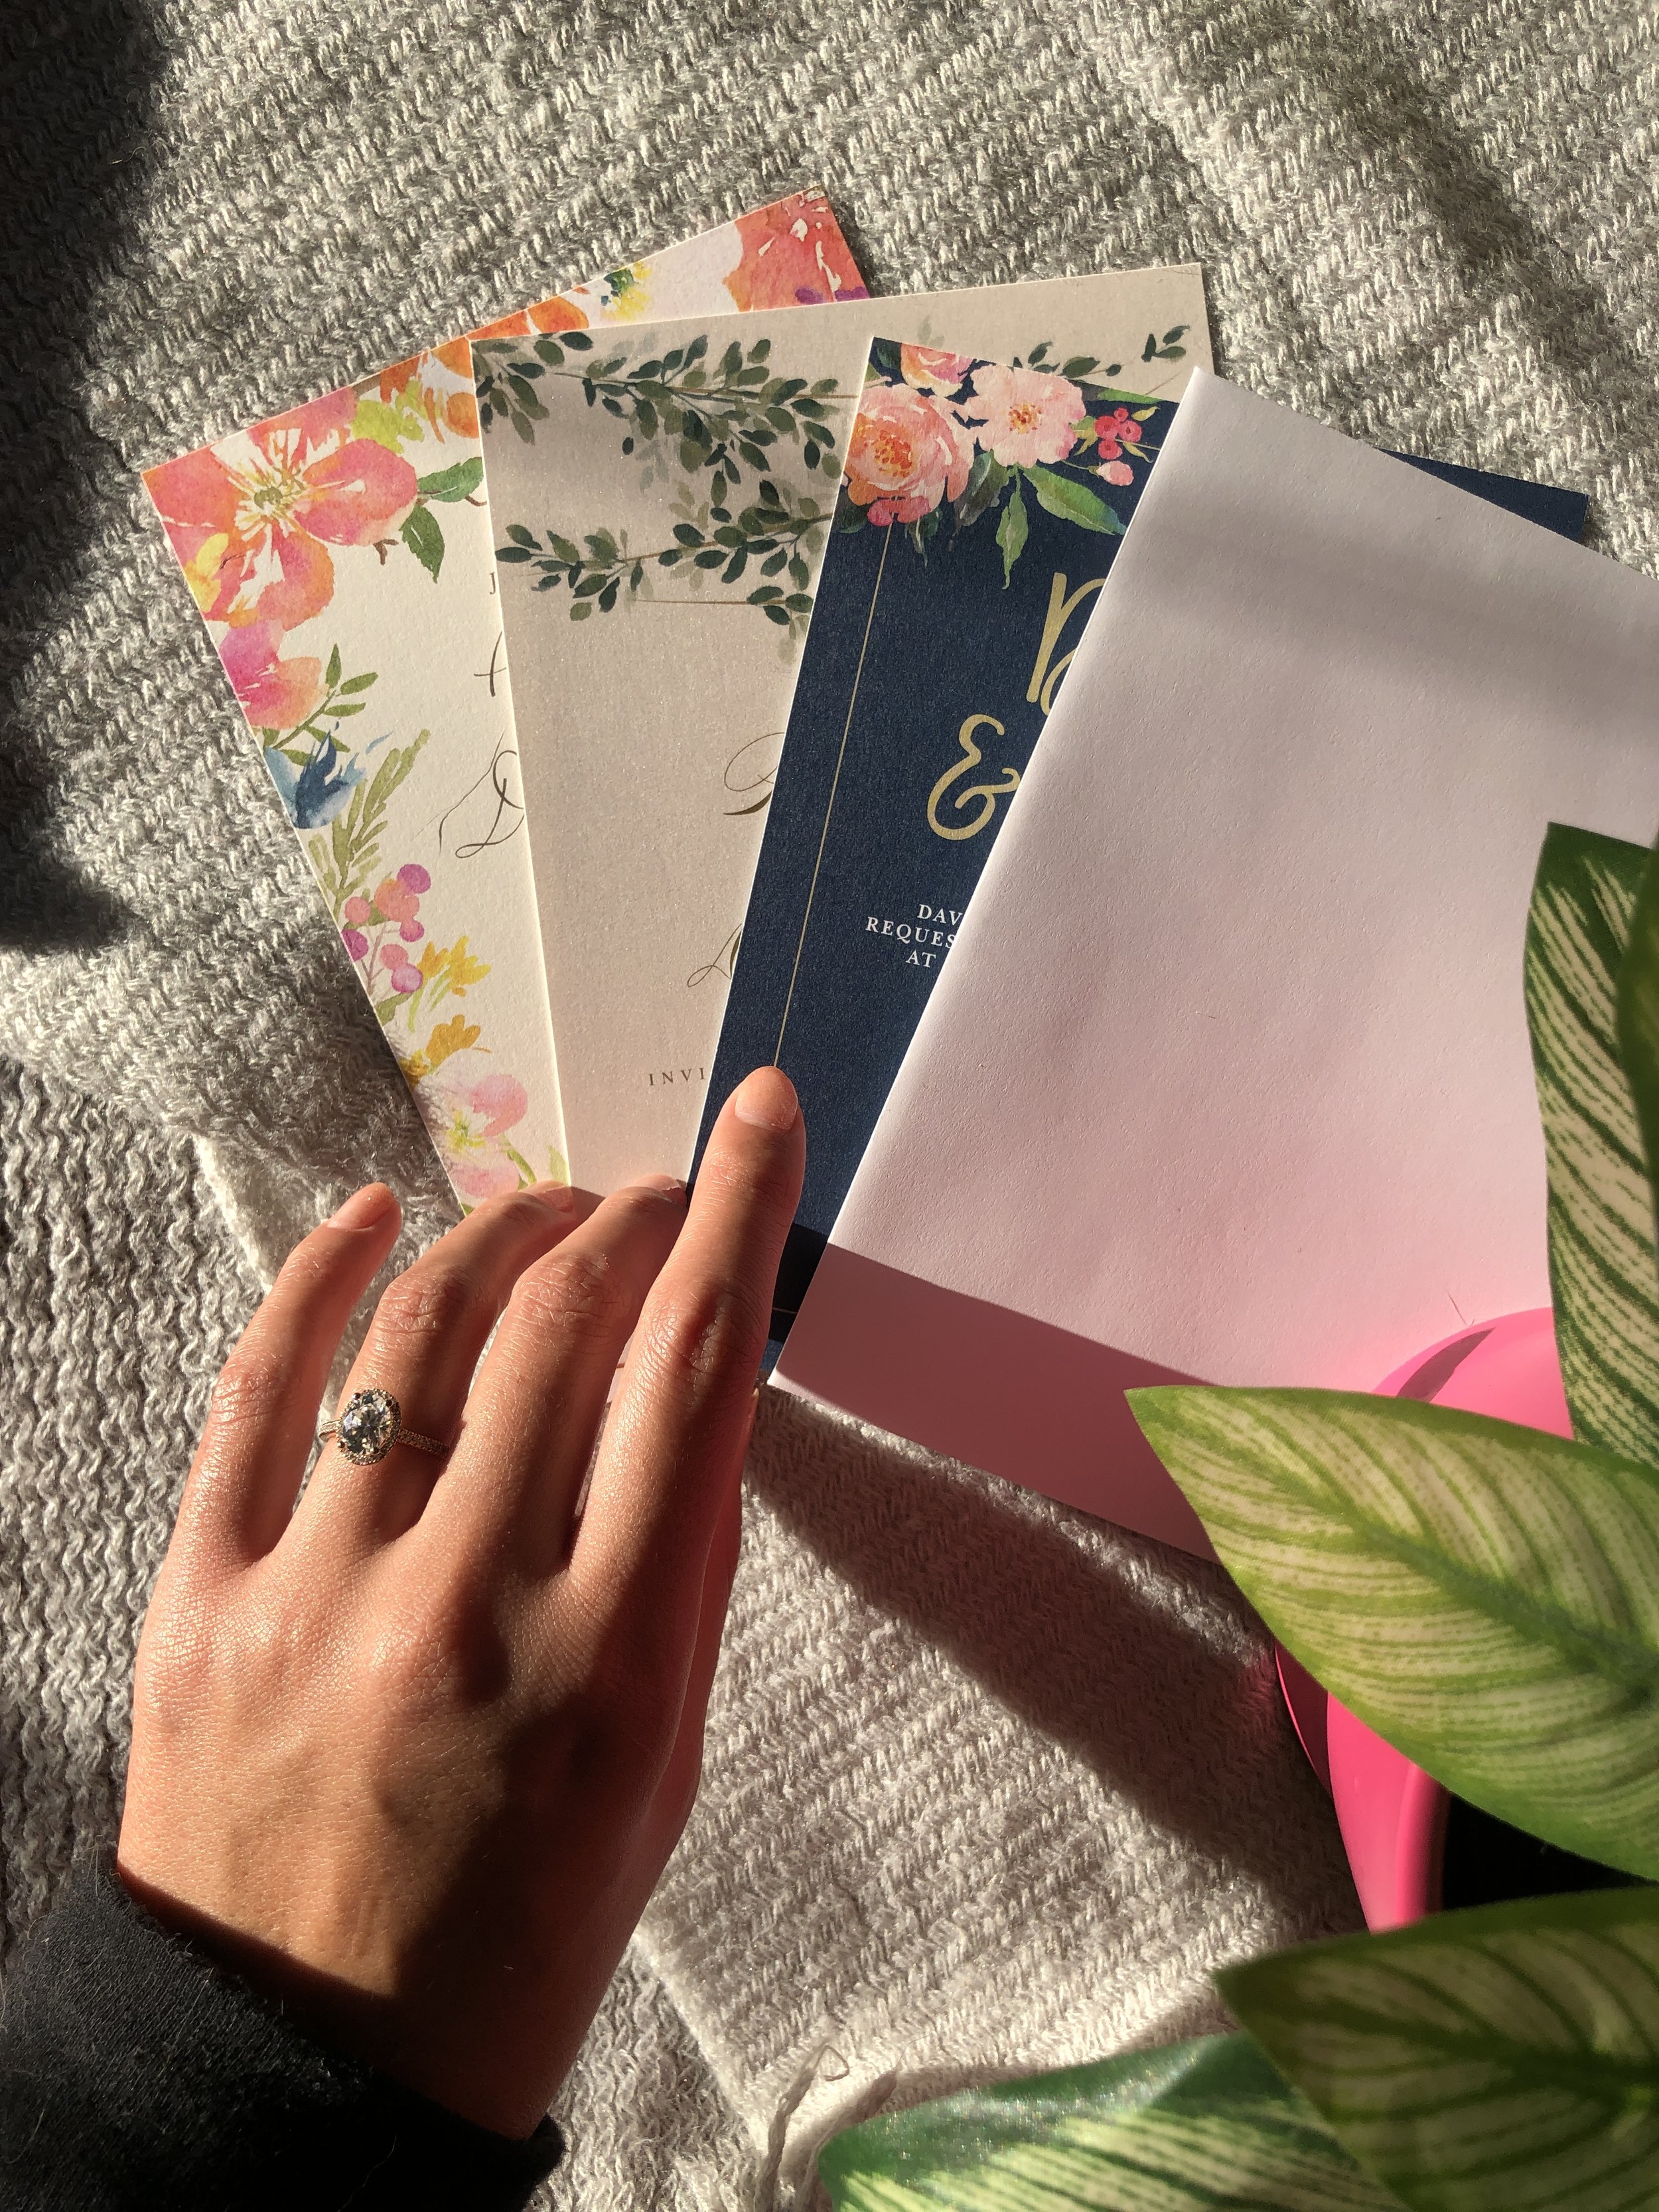
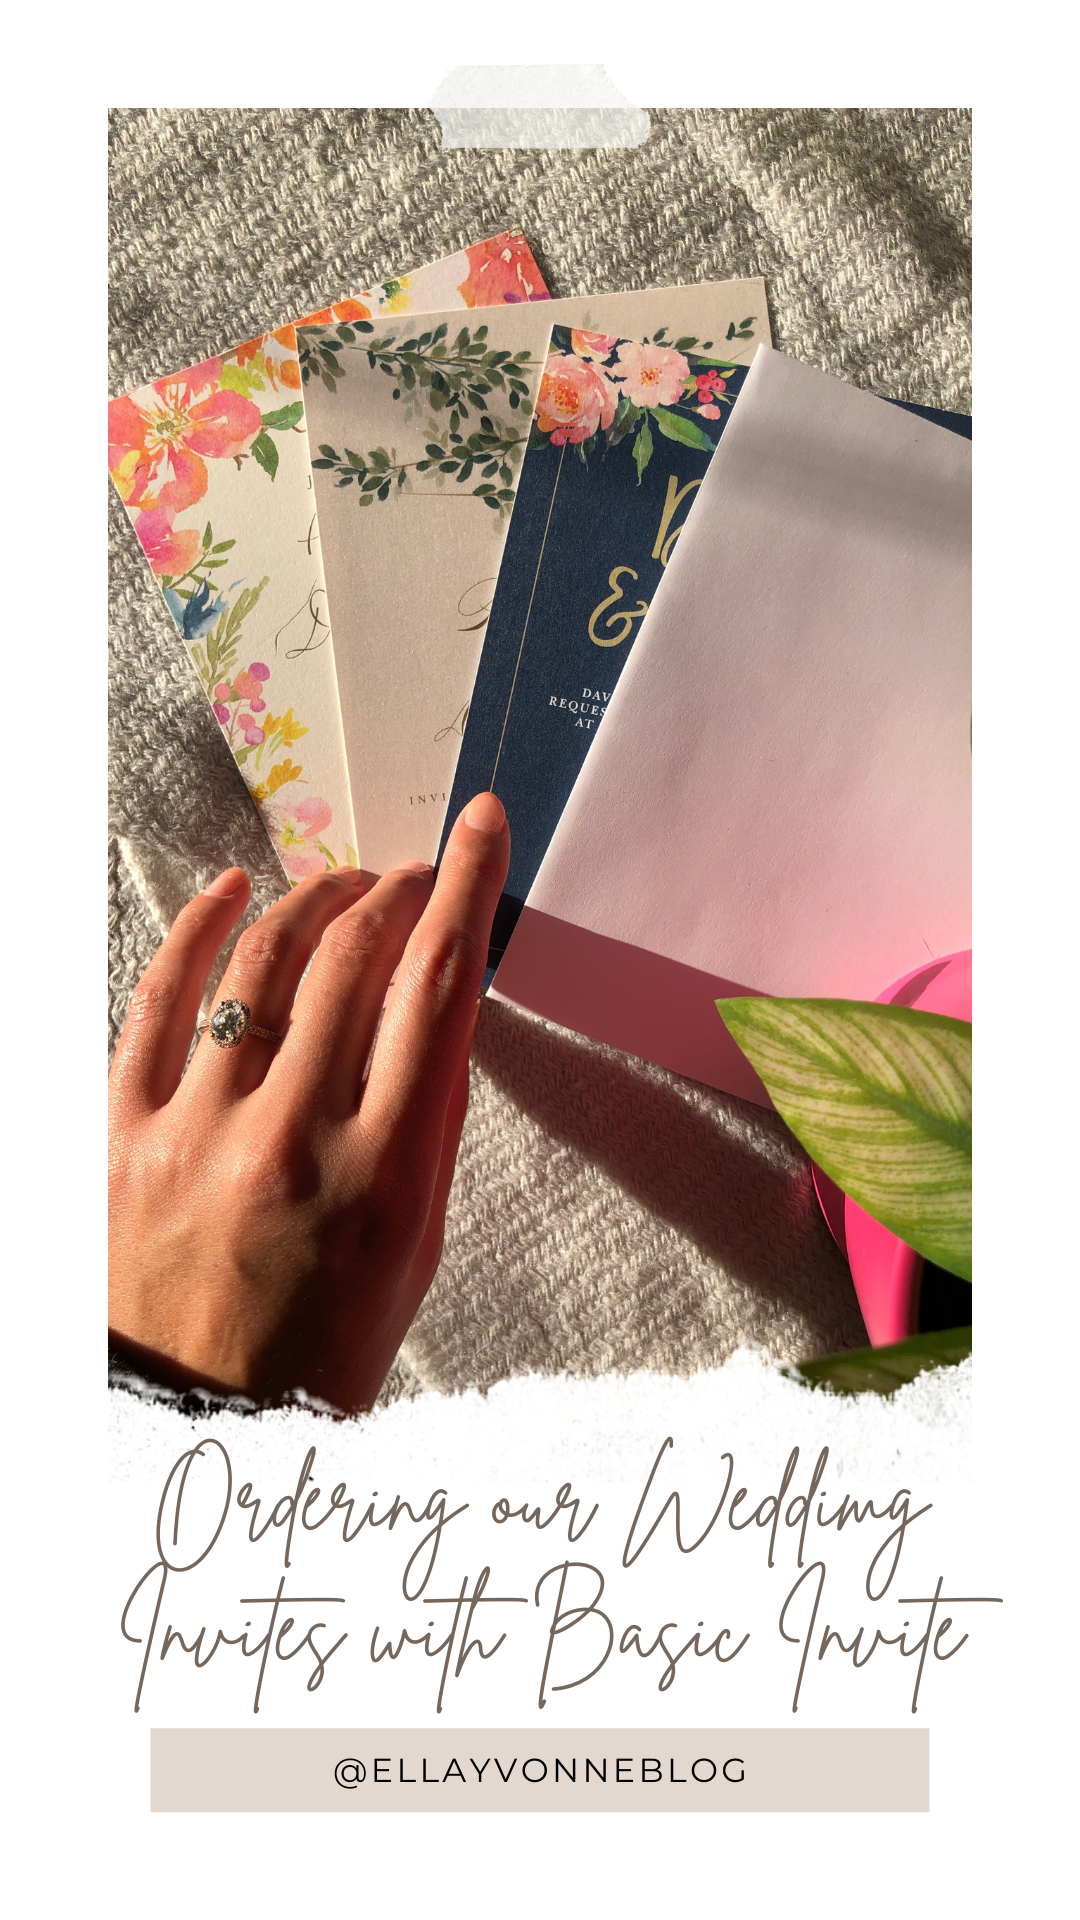
THE SAMPLES

One of my favorite parts of ordering from Basic Invite is that it allows you to order a sample of your exact invite before ordering a full set of them - this includes every part of the customization. I found this extremely helpful because it's hard to know what kind of paper you want and how an actual physical invitation might differ from the digital rendering on the website.

I requested 5 samples with a variety of different paper types and the price for all of the samples would have been around $30. The samples also come with envelopes so you can see how they'll fit with the invitations. On a whim I also ordered their clear invitations and fell in love with them!

WHAT I ORDERED

Since I fell in love with the clear invitation I received in the samples, I decided to order a small bunch of them along with a photo to include behind the clear wedding invitation! For our micro-wedding, we needed less than 10 invitations total so our cost per invitation was a little over $4 per invitation. They are absolutely perfect and I cannot wait to share them with our families!

I've had such an enjoyable experience designing these wedding invitations that I'll definitely be considering them for future holiday cards and potential bachelor or bachelorette party invitations! If you're considering trying out Basic Invite for yourself, right now Basic Invite is offering 15% off with coupon code: 15FF51

Thanks so much for listening to this little ramble! I've thoroughly enjoyed the process of wedding planning thus far and I'm hoping to write some more posts on the process soon - so stay tuned!

YOU MIGHT ALSO LIKE:

My DIY Peloton Setup | How I Created an At-Home Cycling Studio


IMG_4571.jpg
IMG_4738.jpg

Hello, friends! Today, I'm talking about my DIY Peloton setup and my full spin bike review all in one day - whew! Like many people, during lockdown I've been forced to figure out how to continue my workout routine at home - something I very rarely did before lockdown. It's been a learning process and I have some parts of my setup that I love and others that I don't love so much so stick around to learn more!

Why create a DIY Peloton Setup?

Before lockdown, my favorite kind of workout was 100% cycling. Although I used to vary my workouts a lot between cycling, yoga, barre, and boxing, cycling was always my go-to and where I felt most at home. Yoga and barre are pretty simple to recreate at home but cycling? Pretty much impossible! Halfway through lockdown, I found myself really missing my cycling workouts so I decided to take the plunge and create a setup that would allow me to take cycling classes at home.

The second reason I opted for DIY setup was pretty obvious - because of the cost! I enjoy being able to switch up my fitness routine and am a firm believer in being able to adapt your health and fitness routine to certain seasons of life. The peloton itself will cost you at least $2000+ and the subscription another $40/month. Since I do not plan on doing peloton classes every single day, the price tag of a whole peloton system didn’t seem worth it to me.

My Setup:

diy-peloton-11.jpg

Sunny Health & Fitness Spin Bike

For my spin bike, I chose a Sunny Health and Fitness Spin Bike with magnetic resistance and belt drive. Both of these features make the bike feel more similar to the cycling studio experience. I've had a whole load of ups and downs with this spin bike which I wrote about in a whole review post about the bike. I love that the bike is pretty seamless to put together and has a simple digital screen that tracks distance and RPM (not all spin bikes track this and it's pretty crucial in any music-based spin class). The specific bike I purchased also comes with a table stand which was the perfect fit for my specific use case where I throw my tablet on the bike to watch spin classes on the peloton app.

I absolutely love that this bike has made working out at home so much more enjoyable, but there were A LOT of cons to owning this particular bike. Long story short - I can't recommend this bike because it requires way too much maintenance for someone with no bike tech experience, but I'm learning to live with the bike because I've already purchased it and don't want to contribute to more waste by dumping the bike. If you're considering buying from this brand, check out my full review before buying and proceed with caution!

diy-peloton-5.JPG

Peloton App

If you like cycling classes in-person, the peloton app is a great alternative that has a ton of different spin classes, instructors and music styles. I’ve had the peloton app for over 3 months and I still haven’t had a chance to take classes with every instructor because more classes (and more instructors!) are added all of the time. Also, if you’re not into cycling classes, the peloton app offers tons of other types of fitness and wellness classes (meditation, yoga, stretching, running etc.) that make the monthly $13 a month more worthwhile.

diy-peloton-10.JPG

Shimano Spin Shoes + SPD Cleats and Cleat Adapters

I already owned a pair of spin shoes, cleats, and adapters to use at my local spin studio so it was nice to be able to finally use them at home! The spin shoes I own use SPD cleats which meant I also had to purchase cleat adapters - so before you buy, make sure you know what cleats and cleat accessories you may need because it can definitely add up!

diy-peloton-6.JPG
diy-peloton-7.JPG

SPD Clipless Pedals

The bike I purchased came with cage pedals so I purchased a separate set of clipless pedals in order to be able to use my spin shoes. This is by no means necessary but it certainly makes the experience a little more fun! The pedals were super easy to install and I will definitely be keeping the cage pedals in case anyone else in my family intends to use the bike in the future.

diy-peloton-9.JPG

Set of Handheld Weights

I bought a set of handheld weights from Amazon a while back and they have served me VERY well. The set comes with 3 sets of weights - 2 lb, 3lb, and 5 lb which covers most of my at-home workouts.

A couple nice-to-have things I also used with my DIY peloton set up were my iPad, Apple Watch, and fairy lights that were already hung up in my office. These things were by no means necessary, but it was nice to be able to play the peloton classes on my iPad, track my workouts simultaneously on my Apple Watch, and create a nice cozy ambience with the lights!

diy-peloton-4.JPG
IMG_4921.jpg

For me, creating the cycling setup was actually super simple. Since prioritizing my health and fitness routine, I had already purchased my own pair of cycling shoes/cleats and a set of handheld weights for off times when I did happen to work out at home. The apple watch and iPad are both devices I use on a regular basis for my everyday life that were simple to incorporate into my setup. The only new purchases I had to make were the bike itself, the SPD clipless pedals and the peloton app.

diy-peloton-12.jpg

The upsides:

  • More affordable compared to a full Peloton bike setup. The actual Peloton bike will set you back anywhere between $2,000-$3,000 depending on what add-ons or accessories you need. On top of that the Peloton subscription is around $40 for Peloton bike users but is only about $13 a month for app users. In all, I spent around $380 for my spin bike and while again, I wouldn't recommend the specific bike I bought, there are plenty of much better bikes from reputable companies that are available for a fraction of the cost of a Peloton.

  • Flexibility - Having the bike and the tablet separate allows me to take peloton classes wherever I am. Though peloton bike users can also take classes on their devices, the tablet it comes with is connected to the bike and only truly serves one function. I really like that I have an iPad that serves the same function, but outside of my workouts can be used for a million other things in my personal and grad school life.

  • This would also be great for those of you who enjoy changing up your workout routine. The peloton app is great because it offers tons of different workouts but if you're not ready to commit to the $40/mo + $2,000+ price tag and aren't sure you'll use the peloton bike all the time, it may not be worth it to spend on the whole peloton system. Although I'm still subscribed to the peloton app, I've found myself mostly using it for meditation and strength workouts rather than cycling because I've enjoyed watching other videos while I'm cycling. If you're not ready to commit to hardcore taking all of the peloton cycling classes, then starting with your own bike and just the app let's you change up your workouts without feeling guilty 🙂

The downsides:

  • You don't get as many features (like numbers/stats wise) as you would on a normal peloton bike. On the app you can also see other people taking the class but you’re limited in that you can’t really interact with other riders as much or see where you are on a leaderboard. For me, this isn’t a huge downside since I always turn off leaderboard stats in face-to-face cycling classes anyway, but if you’re someone who is motivated by getting ahead on the leaderboard, then this could be demotivating.

  • Bike quality. Obviously, the bike I personally bought was lower in quality than that of a peloton bike but I think this could have been overcome if I had purchased a different bike.

IMG_4591.jpg
IMG_4700.jpg

All in all, I am really in love with my current cycling setup. It doesn't take up a lot of space in my apartment and it feels like a little workout oasis - especially if I cycle early in the morning when the whole apartment is quiet and only lit by the fairy lights. The biggest struggle I had working out during quarantine was not enjoying my workouts because all I could do were HIIT workouts. I'm so happy that this set up allows me to finally do workouts I love again.

loveellasize300signature.png

Shop Similar:

I Tried Intermittent Fasting for a Month | Something New


intermittentfasting1.PNG

Hello, friends! I've been trying to keep up my something new project each month throughout quarantine in an effort to develop better habits and work on self improvement - even during this weird time. Especially when it comes to health and work-life balance, my habits were all over the place at the beginning of quarantine, so I've spent the better part of 6 months trying to develop better ones! Enter intermittent fasting.

What is intermittent Fasting?

Intermittent fasting is where you fast for a long period of time and only eat within a shorter eating window usually in the hopes of achieving some sort of health benefit. The theory of how intermittent fasting works is that when you fast, your body is in a state of ketosis where you are using the extra fat in your body as energy. Intermittent fasting purports to put our bodies into this state of ketosis and also boasts a ton of other health benefits. Intermittent fasting can be done for days at a time or only within certain hours of the day. Some people choose to fast for 2 days and eat for 4 days, some people choose 20 hours of fasting and a 4 hour eating window, but the most common intermittent fasting routine is 16 hours of fasting and an 8 hour eating window - usually somewhere around 12:00 pm - 8:00 pm

While there is a long history of fasting in humans (e.g., certain religions have been fasting for periods much longer than this throughout history), the research on intermittent fasting specifically is more sparse.

The Science:

Based on what I could find, the TL;DR of the science behind intermittent fasting is that there really aren't enough studies about it for us to understand the full benefits or harms of intermittent fasting. There are studies on rats (not the same as humans) and there are studies on intermittent fasting in small samples of humans for short periods of time, but none of these are truly indicative of what long-term effects intermittent fasting might have on us. Therefore, if you choose to try intermittent fasting, know that it's truly experimental in nature and that the effects that people claim to experience from intermittent fasting might be specific only to that person, so listen to your body and make sure that anything you do is best for you.

intermittentfasting2.jpg

Why I wanted to do it:

To reduce bloating and re-establish healthier eating habits.

Pre-quarantine, I wasn't necessarily the perfect eater, but I was busy enough running around on campus that I didn't have the opportunity to sit in my living room and eat 24/7 🙂. Since quarantine, my eating habits have truly been aaaaaaalll over the place. I'm already generally a healthy eater (thank you, mom) BUT I am also 100% one of those people that eats when I'm bored and has very little self control around potato chips and ice cream (it's all about balance right? 😜). The only strategy that usually works for me is getting out of the house to keep my mind busy and banning junk food from my apartment because I know as soon as it enters the apartment, it's as good as gone. So, I wanted to try intermittent fasting to see if I could reset my brain into less snacking, better eating habits, and hopefully less bloating.

The Rules:

There aren't clear guidelines on what to eat during that intermittent fasting period and how long you should fast. This is part of the reason why the evidence behind intermittent fasting is spotty - there are no rules for how to do it, so the effects are inconsistent. I opted for the most common 16:8 fasting rule and fasted for 16 hours with an 8 hour eating window. I am an early bird so I chose an earlier eating window - from 10:30 am to 6:30 pm.

Since there weren't really any hard and fast rules for what you could or could not eat during intermittent fasting and what was supposedly okay to eat during your fasting period, I decided to do what I affectionately called "lazy" intermittent fasting - AKA I let myself drink coffee with creamer in the mornings before my fasting period was over because...let's be honest. I am a nightmare pre-coffee and I wasn't going to put myself (or my partner) through that 🙂

My Experience:

Alright, so I tried it for 30 days. What was it like?

  • The mornings were tough for a while: Hunger-wise, the mornings were tough for me. For the first 2 weeks, I was pretty hungry by 8:30 or 9:00 but had to wait another 1-2 hours to eat. Full disclosure, I wake up at around 5:30 in the mornings so waiting until 10:30 is a whole 5 hours!

  • Your body adjusts: Even though those first couple of weeks were difficult for me, my body started to adjust over time. I'd still be pretty hungry by the time 10:30 rolled around but over time, I was no longer hungry at 8 or 9 and it became easier to wait it out. Eating first thing in the morning has been a longtime habit of mine and it was interesting to see how quickly my body seemed to adjust.

  • Reduces the need to make decisions: As a social scientist, I'm all about the psychology here - and intermittent fasting definitely helped to reduce the amount of decision-making power I needed in the mornings. Studies have shown that your willpower is a limited resource so if you're using that making decisions about when, what, and how much to eat you have less willpower to make other decisions.

  • Challenges the assumption that you have to eat three meals a day: Another good thing I experienced from intermittent fasting was that it challenged my assumption that I needed to eat three meals a day. Don't get me wrong, I love eating any chance I can get but I often eat a meal at the "right" time just because I've been taught that I should be eating at that time - not because I'm actually hungry.

  • Listen to your body: There were a couple of days during my intermittent fasting period where I woke up with a headache or didn't feel 100%. On those days, I completely ditched fasting and took care of my body first.

  • I found it difficult to stick with it: Only being able to eat within an 8 hour window sounds easier than it actually is - especially during non-COVID times. If you're interested at all in socializing and eating/drinking with people outside of your eating window then you have to either break your fast or be the party pooper that doesn't eat. Since I decided to try intermittent fasting during COVID it wasn't as difficult since socializing is limited, but there were certainly still times where I broke my fast in order to have a glass of wine while watching the Bachelor 😂

intermittentfasting3.jpg

Shop Similar:

So, What Happened?

Well, not a whole lot changed in my body after trying intermittent fasting. This could have been partially because I was doing it "lazily" but I truly felt that a lot of the benefits I experienced from intermittent fasting were more psychological than anything.

  • Greater awareness of the things I ate: Because I was doing intermittent fasting, I was more aware of the things I was putting in my body. The process drew awareness to what I was eating so I definitely ate healthier than I normally would have.

  • More intuitive eating: I was also listening a lot more to my body when it came to when I was hungry and why I was eating! Because I was intermittent fasting, my brain would do a double take every time I decided I was hungry and realize I was hungry only because I was bored...not because I was actually hungry 😛

  • I bloated less: Although nothing about my body really changed (e.g., weight, exercise routine etc), I definitely bloated significantly less than I normally do. I think this was mostly due to the fact that I like to enjoy snacks and a bit of booze in the evenings- which really didn't mix with intermittent fasting! Having an eating period that ended at 6:30 meant I snacked a lot less in the evenings and had to give up a drink I might've normally had at 8 pm ☹️

Will I continue?

Sort of. I'm a creature of habit and I like having a mixed drink while I'm watching my trashy reality TV, okay?! It's the simple things in life haha! The reason I say I'll sort of continue is because intermittent fasting has made me a lot more aware of when I'm actually hungry and when I'm not. Being more aware of my actual hunger cues has made me realize I'm actually not that hungry at 5:30 am - contrary to what my habits might tell me. So, while I won't be adhering strictly to an intermittent fasting schedule, I've tried to stick with eating later in the day when I'm actually hungry and trying to only snack when I'm hungry and not when I'm bored.

Long story short, while I think intermittent fasting was a valuable experiment, I think the primary driver of people seeing actual changes in their body is really driven by reducing their calorie intake because eating in a shorter window of time just means you're going to end up eating less overall.

Thanks so much for stopping by and I hope this was helpful for you! If you've tried intermittent fasting, leave me a comment below - I'd love to hear what your experience was like!

loveellasize300signature.png